Beauty, crafts, DIYs, fashion, inspiration, photography, and recipes for the creative soul!
Wednesday, February 20, 2013
DIY: Ribbon Board
 I adore this cute little way to display the things you love on your wall. It's much prettier than a cork board and works the same way! Here's what you'll need:
~a cork board (I used a piece of wood)
~ribbon
~staple gun
~hammer
~fabric big enough to cover board
~batting
~wire/something to hang with

Step 1: Cover the board in batting and fabric and staple to the back of the board. Use the hammer if you need to push in the staples more, you will probably only need to do this if you use a slab of wood rather than a cork board.
Step 2: Lay out and cut pieces of ribbon so that they are in a criss-cross formation.
Step 3: Staple the ribbon to the back of the board first then staple the places where the ribbon crosses.


Step 4: Slide a piece of wire through the staples to hang your ribbon board with.
Step 5: Slide pictures and other things under the ribbon. :)
Nail Art | Ombre + DIY
I used Gradations Polishes for this look. They came in a set of three to pull off this cute ombre look. Here's how to do it:

First you'll need to find 3 polishes; one for a base coat, one for the tip of your nail and one to blend. The 3rd polish should be something clear, I also suggest you find something with sparkles too to blend the other 2 colors further.
Step 1:
Start with your base coat... Mine is a sparkly white. Make sure the base coat is a thick color, put on a couple of extra coats if you have to then let it dry.
Step 2:
Add your second color to the tip of your nail. Don't worry about blending the color. Here I used a metallic color.
Step 3:
Before the color you added in step 2 is dry, blend the two colors together with a clear/sparkly color.
Finished Product:
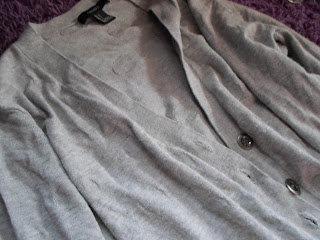
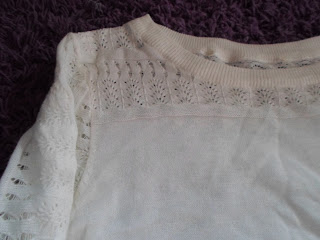
Forever 21, JCPenny's, Charming Charlie's and Francesca's Haul
Although only about 4 of the items are not from Forever 21 I figured I would share them anyway considering I got them around the same time.
A couple things I've learned from this: my camera is not the best representation of color...
Shoes (about $25):
Blue Sweater (about $8):
Navy Blue Cardigan (about $9):
Pink Polka Long-Sleeve (about $5):
White Lacey Top (about $20; Francesca's):
A couple things I've learned from this: my camera is not the best representation of color...
Saturday, February 9, 2013
Pretty Picks | Retro Inspired Headbands


These retro inspired headbands are totally cute and perfect for adding some sparkle to your hair. You can pull off this look in three simple steps:
1. Pull the hairband over your head first. Then, take a comb and part your hair down the middle.
2. Take two sections of hair from the front and hold away from the rest of your hair. (I usually just hold the sections of hair in my mouth xP).
3. When you pull the headband over your head and in place make sure the back is under your hair and the front is over your two sections of hair.
Nail Art | Gold Hearts
Perfect for Valentine's Day, these nails stay away from the cliche pink and red but are still very romantic. I used NYC plum purple color as a base with gold hearts from Icing's and sparkly gold lines from Art Club's nail art polish.
Iced Cappuccino Drink Recipe
Welcome back readers! I know it's been a long time since I've posted anything and I'm always giving empty promises, but I'm happy to say I have a lot in store for you and whether I get to posting it all now or in another month I do have a lot of planned today. So without further a do here's my iced cappuccino recipe!
What You'll Need:
~Milk
~Chocolate Syrup
~Ice
~a K-cup of your choice (I like Grove Square's single cup cappuccino mix)
~whipped cream if desired
.JPG)
.JPG)
What To-Do:
I usually eye stuff when I make smoothies or drinks with my blender so this is just an estimate; feel free to adjust it how you like. Chop about 5 ice cubes in a blender until very fine. Then add enough milk to cover the ice, your choice of K-cup and a couple squirts of chocolate syrup. Blend until smooth. Pour in a favorite cup and enjoy. Serves 1 person.
Subscribe to:
Comments (Atom)


