Showing posts with label DIY. Show all posts

Saturday, December 14, 2013

Handmade Christmas Card Ideas

Handmade Christmas cards are a ton better than store bought cards. They're unique and can say whatever you want. If you're stuck on what you want your holiday cards to look like here are a few ideas that I used for mine. Some basic supplies you might want are: white paper, red, green, black sharpies (skinny are best for detail), scissors (pattern perhaps?) buttons and ribbon. :D

Idea 1: Ribbon as a bow to a gift. Draw a box with a skinny sharpie and decorate the 'wrapping paper' however you'd like. Tie a bow with ribbon and add it to the top of your box. Voila!

Idea 2: Simply doodle whatever you'd like with some red and green sharpies. For mine I did a candy cane, but there are many more options; a tree, snowman, Santa - anything festive. :)

Idea 3: Glue buttons as part of a larger picture. Think about the different things you can incorporate buttons with - a snowman, a wreath a Christmas tree - there's many possibilities.


Idea 4: Include in your card one of the interests of the person you're giving it to. Such as my Doctor Who themed card below. Don't forget to add some references to the inside of your card. 

Wednesday, December 11, 2013

DIY Chalkboard Serving Plate

Here's a wonderful idea for a holiday decoration in your home or a gift for a friend. First, you simply use chalkboard paint and paint the inner part of a serving plate. Make it holiday themed with a fun Christmas or winter scene drawn with chalk. To add black detail wet a q-tip and draw over the chalk design. This is what I did:

Tuesday, December 10, 2013

DIY Photo Collage

As you've probably noticed in many other posts, I have a tendency to create photo collages with pictures. I thought that this would also be a perfect gift idea. Just follow the instructions below on how to make your own photo collage with Picasa, print out your masterpiece and fit it with a frame. 

Step 1:
~Import your photos. Click on 'Import' in the top left corner of Picasa. You can either import from a folder on your computer or from a camera plugged into your computer. At the bottom be sure to create a folder for your new imported photos to go. When you're done click 'Import All'.


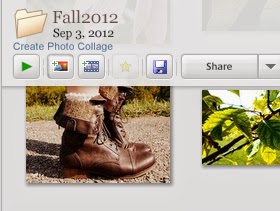
 Step 2: Go to the folder you created. Under the title of the folder there should a 'Create Photo Collage' button. Click on that and a new collage will be created with all of the photos.


Step 3: Change the layout of the photos, add clips or take away some clips and mess around with the final touches. When you're done click 'Create Collage' and your collage is finished! Print it out and frame it for a close friend or family member for the holidays. 


Saturday, December 7, 2013

Winter Inspired Nails

Here's one of many inspired nail art looks for the winter season. Although it's very simple I think it looks adorable with whatever you're wearing. 

I used these colors for the design. Sparkles are another cute touch also :)

Friday, December 6, 2013

DIY Bold Ribbon Bracelet

Just a quick DIY for Day 6 of 25 Days of Christmas Crafts! This bracelet is a perfect gift to give away or a wonderful piece to a holiday party outfit! :)

What you need:
~Solid colored bangle
~Ribbons

What to do:
Without cutting the ribbon, wrap it around your bracelet and tie a bow; don't worry, it doesn't have to be perfect. Cut off the excess and then untie your bow. You can now use this length of ribbon to measure out the other ribbons. You can have as many as you want; for mine I chose to do three. Simply tie your lengths of ribbon in a bow around your bracelet and pull it tightly. Get creative with other colors combinations like red and white or different hues of blue. :D


Thursday, December 5, 2013

Holiday Decoration Inspiration

Need some new ideas for your holiday decorating? Here's 4 new things you can do with your decorations.

1. Display a Scene: This doesn't have to be a nativity scene, there are many more possibilities! Try a winter theme with fake snow and snowmen and possibly some snow covered trees. This scene can be displayed on a shelf, on top of tables or cabinets, in a shadow box or below your Christmas tree. 

2. Focus on the Dinning Table - Your table in your dinning room is one of the main places that you should focus on decorating. Try making a center piece, the options are endless for what you could do. Candles, golden accents and festive trinkets are a must for the holiday season. Chose some colors you really love that you can use on your table setting as well as the rest of the room to pull the area together.


3. Add Your Own Artwork - You don't necessarily have to know how to paint to add a cute photo to the wall of your house, thrift stores are a great way to find unique paintings. You can re-purpose the painting and add a new matte with an intricate frame. In this picture I have two newly matted pictures as well as some cute wall stickers. Though you may not have painted the pictures yourself, the display of them is artwork on it's own.

4. Lights - Think of some different places you can use your extra Christmas lights or maybe even change up the lights you normally use on your tree. Putting white lights on your tree give it a gold like color and a classic feel while multicolored lights add a festive feel and is obviously much more colorful; blue lights are also a wonderful way to create a wintry essence. The best part about the holiday season is that you can pretty much get away with putting lights anywhere and everywhere. Don't be afraid to add a string around a mirror, doorway or window.

Tuesday, December 3, 2013

Christmas Playlist

The best gift to give (well one of the best) is the gift of music. Here I collected a list of my favorite seasonal songs. You can burn these songs on as a mixed CD and give it to a friend in a cute decorated CD case. Here I've also included a tutorial to burning CD's with iTunes as well as ways to decorate your CD case and things you must inclued.

Top 10 Favorite Seasonal Songs:
  1. Merry Christmas, Happy Holidays by Chicago
  2. Peppermint Winter by Owl City
  3. Jingle Bell Rock by Brian Setzer 
  4. I'll Be Home for Christmas by Dean Martin ft. Scarlett Johansson (2011)
  5. Miracles by Kenny G
  6. Last Christmas by Metro Station
  7. Winter Moon by Mindy Gledhill
  8. I Don't Want to Spend Another Christmas Without You by The Ready Set
  9. O Holy Night by He is We
  10. Meet Me Under The Mistletoe by Never Shout Never

How to Burn a CD with iTunes:

Step 1: Go to the top left corner of iTunes and click on the tiny black and white box. Select new and then new Playlist. Or just press Crl + N for a shortcut.

Step 2: Add the songs or albums you would like to your playlist by dragging them over to the side. If you add too many your CD may not be able to burn all of them so don't go overboard. Name the playlist if you would like and then click done when you're finished. 


Step 3: Go to playlists in your iTunes library. Right click on your playlist and select 'Burn Playlist to Disc.' 


Step 4: This message will pop up. Select the amount of gap time you would like between each song and click burn. Your CD drive will pop open and you can insert a blank CD. 


Step 5: Wait for iTunes to do it's thing and enjoy your newly burned CD! 

CD Case Decorating Ideas/Must Haves:

  • Include a list of the songs ~ Make sure to let the receiver of your gift know what songs are included on the CD so that they can continue to share the songs to more people. You can type or hand write the list out in order cut a cute border and paste on the back of your case with ribbon or buttons. 

  • Add another surprise inside ~ Like movie tickets or a gift card; you can fit them on the inside of the case as an extra surprise gift. 

  • Write a message on the cover slip ~ After decorating a cute front for your case on some paper, fold it and add a letter or message on the inside. Slip it into the front of your case and add a small arrow in the corner to let them know it's there. 

  • Decorate with fun items ~ Use things like stickers, buttons, ribbons, little doodles, fabric, fun patterned paper and music notes. Anything goes!


Monday, December 2, 2013

Homemade Beauty Products

We all need some time to relax during the holidays. Here's a few good homemade beauty products that you can use to pamper yourself when the hustle and bustle of the season gets too rough or you could whip up these products and give it to a friend as a gift.

Avocado Deep Conditioner:
Lasts: Use as soon as you make it.
Ingredients: Avocado, extra virgin olive oil and honey.
Steps: Cut your avocado (use 1/2 with short hair and a whole with longer hair) and mix with a tablespoon of honey and a tablespoon of extra virgin olive oil in a bowl. Apply a small amount to top of hair and a larger amount to the lower section of your hair; secure away from face and clothing. Leave the mask in for about 15-20 minutes and then take a shower.
Great For: People with dry hair. This mask will help strengthen, soften and moisturize your hair as well as reduce frizz and help your hair grow.

Homemade Lip Scrub:
Lasts: About 2 weeks (placed in fridge)
Ingredients: Olive oil, honey, coconut oil, brown sugar.
Steps: Mix about a spoonful of each ingredient in a bowl and pour into a container. Take off of your lips whenever you deem is the right time.
Great For: Gets rid of dry skin and softens your lips by exfoliating. This product is also edible :)

Easy Facial Toner:
Lasts: About 1 week
Ingredients: Water and chamomile tea
Steps: Heat up the water and add your tea bag. Once brewed for about 1-2 minutes pour into a container. Apply with a cotton pad in the morning or right before bed.
Great For: All skin types. This product will soothe and cleanse the skin.


Sunday, December 1, 2013

Cute Candy Cane Jar


What you'll need:

~ Stuffing
~ Red and green buttons
~ Red and green ribbons of your choosing
~ Glass jar
~ Candy canes

~*~*~*~*~*~*~*~*~*~*~

Tie your ribbons together in a bow around the top of your jar and arrange it to your liking. Next fill the jar half way with stuffing. Add in some red and green buttons of various sizes. Fill the rest of the jar with stuffing and buttons; this helps the buttons to be spread out evenly. Add candy canes and place wherever you want! You can use this jar for pretty much anything you like to add a cute little Christmas decoration to your home. <3


25 Days of Christmas Crafts

To get into the holiday spirit I thought it would be a good idea to make a new post everyday for the month of December until Christmas. What better way to prepare for the holidays than to share a new crafty DIY each day? You can use these ideas as gifts or simply for a cute way to decorate your house. Craft idea for day 1 will be up shortly so be on the look out! ~ Happy Holidays ~

Sunday, April 28, 2013

Memory Jar

Here's a DIY on how I decorated my memory jar; you can do anything you want with yours. All you need is some kind of jar and decorations (I used different kinds of ribbon for mine).

There's only one step to this: Cut your ribbon to size and tie it around the jar. You can write special memories on pieces of paper and place them in the jar. :)


Wednesday, February 20, 2013

DIY: Ribbon Board

I adore this cute little way to display the things you love on your wall. It's much prettier than a cork board and works the same way! Here's what you'll need:


~a cork board (I used a piece of wood)
~ribbon
~staple gun
~hammer
~fabric big enough to cover board
~batting
~wire/something to hang with


Step 1: Cover the board in batting and fabric and staple to the back of the board. Use the hammer if you need to push in the staples more, you will probably only need to do this if you use a slab of wood rather than a cork board.


Step 2: Lay out and cut pieces of ribbon so that they are in a criss-cross formation.


Step 3: Staple the ribbon to the back of the board first then staple the places where the ribbon crosses.


Step 4: Slide a piece of wire through the staples to hang your ribbon board with.


Step 5: Slide pictures and other things under the ribbon. :)

Nail Art | Ombre + DIY

I used Gradations Polishes for this look. They came in a set of three to pull off this cute ombre look. Here's how to do it:

First you'll need to find 3 polishes; one for a base coat, one for the tip of your nail and one to blend. The 3rd polish should be something clear, I also suggest you find something with sparkles too to blend the other 2 colors further.


Step 1:
Start with your base coat... Mine is a sparkly white. Make sure the base coat is a thick color, put on a couple of extra coats if you have to then let it dry.


Step 2:
Add your second color to the tip of your nail. Don't worry about blending the color. Here I used a metallic color.


Step 3:
Before the color you added in step 2 is dry, blend the two colors together with a clear/sparkly color.


Finished Product:


Sunday, August 19, 2012

DIY: Distressed Jeans


You can make ripped jeans with just a pair of scissors. The best part? You don't have to spend a fortune buying distressed jeans from the store. Here's what you need to get started:

~Scissors
~Tweezers
~Pair of jeans you don't mind cutting-any will do it just depends on your liking; if you can't seem to find a pair you want to cut try buying a pair from the thrift store (mom jeans work best when cut down for distressed shorts.)


Step 1: Cut a few slits where you would like your distressed patch to be; have each cut parallel to the other as well as parallel to the bottom of your jeans. Make sure you don't cut the back of your jeans.


Step 2: You will see blue and white strands of thread; using the tweezers pull away the white strands of thread until you can easily see each individual blue thread.


Step 3: Pull out the individual blue threads, this should leave all the remaining white threads so that they look like this:


Step 4: Throw the jeans in the washer and dryer to help with distressing the holes even more. 

Saturday, August 18, 2012

DIY: Envelope Notes

These pretty string of envelopes are perfect for hanging near a desk for keeping notes in. I also like to use it for holding sticky notes, bookmarks, small cards, and photographs. You can use yours however you want; here's how to make 'em: 


First you have to make your envelopes-you can choose any kind of paper just make sure you cut it into a square.


Once you've made about 5 or 6 envelopes it's time to tape them all together. Tape each top flap of the envelopes to the back of another until you get one long string. To hang them you can use thumb tacks or sticky tack; for mine I taped a little piece of ribbon to the top in a looped shape. Whatever fits your style best :)


Friday, August 17, 2012

DIY: Locker Pocket

These cute jean pockets are perfect for storing your pens and pencils on the door of any locker. Instead of those big tin containers that don't always allow you to shut your locker correctly, these lil' pockets are thin enough to not stop your locker from shutting-even with pencils in them :)

You can make these yourself in just a few steps; here's what you need:

~Pair of old jeans
~Scissors
~Hot glue/double sided tape (or just anything sticky)
~Magnets


Once you have everything the rest is really simple:

Step 1:

Take your pair of jeans and cut around the pocket; make sure you are getting both the pocket and the fabric behind the pocket. Don't just cut off the front or all your stuff will fall out the bottom.


Step 2:

Take two magnets and glue/stick them on each side of your pocket like so
Step 3:

Test them out on your locker and make sure they don't fall when you try to put stuff in them. If they sag or don't stay up try using stronger magnets or just add more to the back and bottom of the pockets. 

This was a little bit self explanatory but that's what makes it easy. I hope you like the new idea, let me know what you think. :)

Thursday, August 16, 2012

Smile Supplies :D

Ah yes, the time has come for everyone to get ready for school. Whether you go to a public or private school or you study at home I'm sure you're probably getting your supplies list together. Of course I'm past lil' puppy covered supplies and the fancy pattern binders never come in the proper sizes; so I'm usually stuck with boring solid colored supplies Here's a list of little things that can make oh so blah school supplies pretty ;D

~Stickers-Probably the easiest way to add some fuzz/sparkle/smell or just a plain picture..
~Sharpies-Hand 'em to your friends to write funny notes and prepare to laugh every time you read :D
~Colored/Pattern Duck Tape-Can cover multiple binders/folders for an instant color change.
~Ribbon-When tied on the zipper of a pencil bag or the top of a planner, they serve for convenience and looks.
~Sticky Notes-Another useful item for marking your page, try to buy 'em in fun shapes or colors

Hope I helped! Tell us your creative school supplies ideas :)